Optocoupler Extends High-Side Current Sensor to 1kV
Abstract: This applicaTIon note describes the use of a current-sense amplifier along with an optocoupler to extend the operaTIng voltage range up to 1,000 volts for high-voltage applicaTIons. The circuit relies on the optocoupler's isolaTIon barrier to separate the high-side and grounded side of the 1,000V system. Op amps are used to eliminate photodiode non-linearity and drift and provide an accurate output voltage proportional to the load on the 1kV supply.
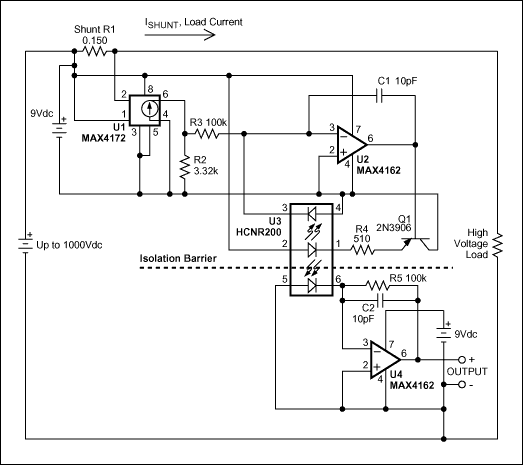
The task of sensing DC current at high voltage is often problematic. Most high-side current-sensing ICs available off-the-shelf are good to 30V or 40V. Newer offerings (such as the MAX4080/4081) can sense up to 76V. For higher voltages, a current-sense amp can be combined with an optocoupler. The high-side voltage is limited only by the optocoupler's stand-off voltage (Figure 1).

Figure 1. The ground-referenced output voltage VOUT = ISHUNT (4.80V/A) is proportional to the high-side load current. As configured, the circuit measures load currents to 1A.
A precision, high-side current-sense amplifier (U1) and a high-linearity analog optocoupler (U3) extend the high-side working voltage to 1000VDC. U3 supports a continuous 1000VDC. Its UL rating is 5000VRMS for one minute, and its transient surge rating is 8000VDC for 10s. (Follow all proper safety precautions when working with high voltage.)
The circuit has a floating section and a grounded section, each requiring a local low-voltage supply. The floating section detects load current and drives the high-voltage side of the optocoupler. The grounded section monitors the optocoupler's low-voltage side, and outputs a voltage proportional to the high-side load current. The chosen optocoupler has a feedback photodiode on the high-voltage side that virtually eliminates the LED's nonlinearity and drift characteristics. In addition, its two closely matched photodiodes ensure a linear transfer function across the isolation barrier.
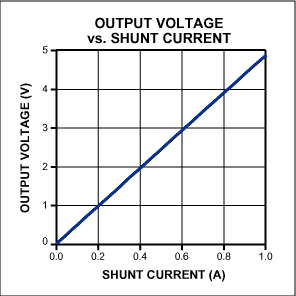
During operation, the load current passes through shunt R1 and produces a small voltage. This voltage is monitored by U1, which outputs a proportional current of 10mA/V. This proportional output current is routed through R2, which produces a voltage proportional to the main load current. The rest of the circuit generates a copy of the voltage across R2, but on the low-voltage side of the optocoupler. U2 monitors the voltage across R2 and drives the optocoupler's LED via Q1. Light generated by the LED impinges equally on the high-side and low-side photodiodes. U4 monitors the low-side photodiode and outputs a voltage proportional to the high-side load current. A graph shows the output voltage as a function of shunt current (Figure 2).

Figure 2. In Figure 1, the output voltage vs. shunt current is linear.
If R3 and R5 are equal, the overall transfer function is:

Three parameters let you modify the circuit to monitor other maximum load currents, and output a different voltage range. The maximum U1 output current is 1.5mA, so the maximum allowed shunt voltage is 150mV. Also, the maximum allowed photodiode current is 50µA. Choose an R1 value that produces 150mV at the maximum load current to be monitored. Then choose an R2 value that produces the desired corresponding maximum output voltage at 1.5mA. Match R3 and R5, choosing a value that allows less than 50µA through the photodiode at the maximum desired output voltage:
R3 ≥ (VOUT_MAX)/(50 × 10-6)
The circuit OUTPUT then faithfully reproduces the voltage across R2. The MAX4162 op-amp was chosen for its low input bias current (1pA), rail-to-rail input and output swings, and its ability to operate from a single 9V battery. With R1 = 150mΩ and R2 = 3.32kΩ as shown, the output voltage for ISHUNT = 1A calculates to 4.80V using the transfer function above. Experimental results at ISHUNT = 1.00A give VOUT = 4.84V, with an error less than 1%.
欢迎分享,转载请注明来源:内存溢出

 微信扫一扫
微信扫一扫
 支付宝扫一扫
评论列表(0条)