OverviewThis application note describes how to use the Keil µVision2™ suite of tools to build a C application for the Ultra-High-Speed Flash family of microcontrollers, which includes the DS89C430, the DS89C440, and the DS89C450. The process of loading the compiled application into the microcontroller using Dallas/Maxim's Microcontroller Tool Kit application is also covered.
All development for this application note was done using the DS89C440 and the High-Speed Microcontroller Evaluation Kit Board (Rev B). The C application was created and compiled using Keil's µVision2 version 2.40 and the Keil C51 Compiler version 7.10. The compiled application was loaded into the DS89C440 flash memory using the Microcontroller Tool Kit version 2.1.03.
Notes on the Ultra-High Speed Flash Microcontroller FamilyThe microcontrollers in the Ultra-High Speed Flash family are all programmed identically, with the same register set and memory mapping. The only difference between them is in the amount of internal flash memory they have, which is as follows.
- DS89C430 — 16 kB x 8
- DS89C440 — 32 kB x 8
- DS89C450 — 64 kB x 8
Creating a New Project
In Keil µVision2, select Project -> Create New Project from the menu. Enter the name of your new project.
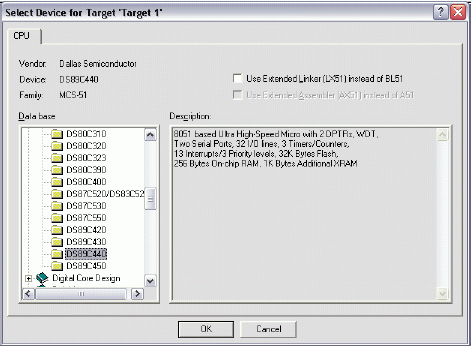
The Select Device for Target dialog will appear as shown below in Figure 1. Under Database, select Dallas Semiconductor and the particular microcontroller you are using (the DS89C430, DS89C440, or DS89C450). Hit OK to continue.

Figure 1. Selecting the device for a new Keil µVision2 project.
A new dialog box will ask, "Copy 8051 Startup Code to Project Folder and Add File to Project?" Select YES.
Setting Project Options
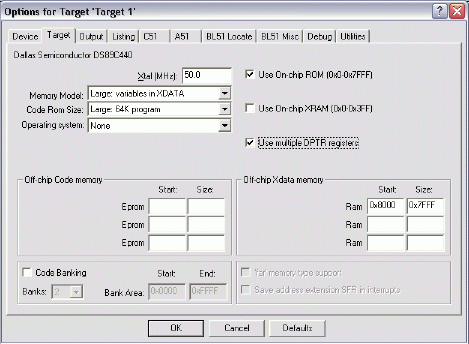
When the project window opens on the left, open up Target 1. Right click on Target 1, and select Options for Target 'Target 1'. An Option dialog box will appear. Select the Target tab. Change the settings in this tab as follows.
- Memory Model — Set to Large: Variables in XDATA. This tells the compiler to locate variables in external MOVX RAM. This is appropriate when using a hardware setup, such as the High-Speed Microcontroller Evaluation Kit, which provides external data memory for the DS89C430/440/450.
- Code ROM Size — Set to Large: 64K program.
- Set the checkbox for Use On-Chip ROM (0x0000 to 0x7FFF). This tells the compiler that we will be placing program code in the on-chip flash memory.
- Set the checkbox for Use multiple DPTR registers.
- In the Off-chip Xdata Memory section of the dialog, set the top two fields to Ram Start: 0x8000 and Ram Size: 0x7FFF.

Figure 2. Target option settings for the DS89C430/440/450.
Next, select the Output tab. Set the checkbox for Create Hex File. This hex file will be required to load the project code into the microcontroller using the Microcontroller Tool Kit.
Adding the Project Code Open a new file and enter the following C code:
#include#include // Initialize serial port 0 to 14400 baud (16.384MHz crystal) serialInit() { TMOD = 0x21; // Timer 1: 8-bit autoreload from TH1 TH1 = 220; // 14400 baud rate CKMOD = 0x38; // Use system clock for timer inputs T2CON = 0x00; // Serial 0 runs off timer 1 overflow TCON = 0x50; // Enable timers 0 and 1 SCON0 = 0x50; // Enable serial port 0 SBUF0 = ' '; } void main() { serialInit(); // Initialize serial port 0 printf("\r Hello from the Keil C51 compiler\r "); while (1) { ; // Endless loop } }
Save this file as main.c. The file will not be automatically added to the project. To add the file, right-click on Source Group 1 and select Add Files to Group 'Source Group 1'. Select main.c and click Add, then click Close.
Compiling and Loading the Project
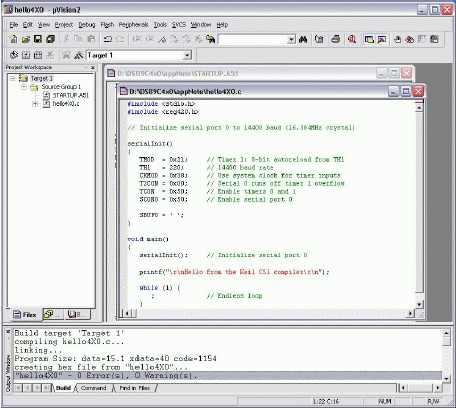
To compile the project, press F7, or select Project -> Build Target from the menu. If no errors occur, messages should appear indicating that compilation completed successfully, as shown in Figure 3.

Figure 3. Compilation output from Keil µVision.
The Microcontroller Tool Kit software is available from the Maxim/Dallas website at www.maxim-ic.com.
Once the Microcontroller Tool Kit software is installed, open it. In the initial dialog box, select the device type you are using (DS89C430, DS89C440, or DS89C450). Next, select Options -> Configure Serial Port from the menu. Select the serial port that you are using to connect to the microcontroller system (such as COM1, COM2...) and select a baud rate of 14400 baud.
Power on the High-Speed Microcontroller Evaluation Kit board at this point. The board should be set up as follows.
- Serial cable connected from PC COM port to DB9 connector J2 (SERIAL0/LOADER)
- DIP switches SW1.1-3 and SW4.1-2 should be ON; all other DIP switches should be OFF.
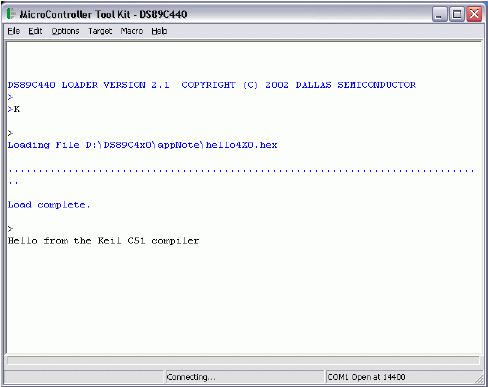
At the loader prompt, type 'K' and press enter. This erases the flash memory on the DS89C430/440/450. Next, select File -> Load Flash from the menu (or press Ctrl+O). Select the .hex file from your project's compiled output and click Open in the dialog box. A "Loading File...Load complete message should appear."
At this point, simply turn off DIP switch SW4.1 to exit loader mode, and the application should execute and display the demonstration message over serial 0, which will be displayed in the Microcontroller Tool Kit window.

Figure 4. Loading and running the application in MTK.
欢迎分享,转载请注明来源:内存溢出

 微信扫一扫
微信扫一扫
 支付宝扫一扫
评论列表(0条)