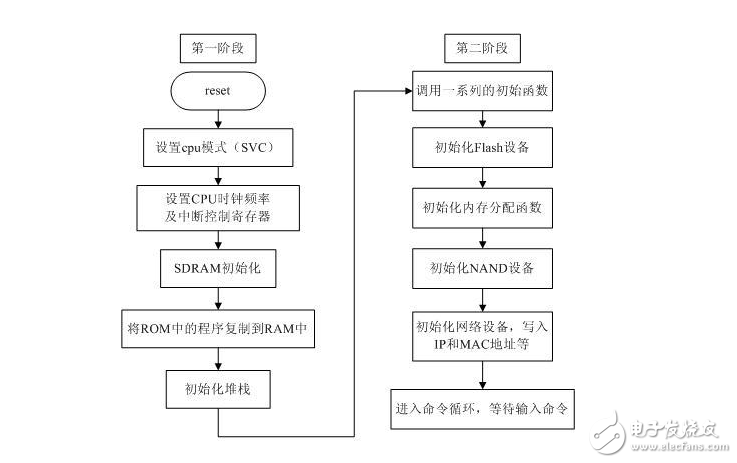
U-Boot,全称 Universal Boot Loader,是遵循GPL条款的开放源码项目。U-Boot的作用是系统引导。U-Boot从FADSROM、8xxROM、PPCBOOT逐步发展演化而来。其源码目录、编译形式与Linux内核很相似,事实上,不少U-Boot源码就是根据相应的Linux内核源程序进行简化而形成的,尤其是一些设备的驱动程序,这从U-Boot源码的注释中能体现这一点。
U-Boot不仅仅支持嵌入式Linux系统的引导,它还支持NetBSD, VxWorks, QNX, RTEMS, ARTOS, LynxOS, android嵌入式 *** 作系统。其目前要支持的目标 *** 作系统是OpenBSD, NetBSD, FreeBSD,4.4BSD, Linux, SVR4, Esix, Solaris, Irix, SCO, Dell, NCR, VxWorks, LynxOS, pSOS, QNX, RTEMS, ARTOS, android。这是U-Boot中Universal的一层含义,另外一层含义则是U-Boot除了支持PowerPC系列的处理器外,还能支持MIPS、 x86、ARM、NIOS、XScale等诸多常用系列的处理器。
这两个特点正是U-Boot项目的开发目标,即支持尽可能多的嵌入式处理器和嵌入式 *** 作系统。就目前来看,U-Boot对PowerPC系列处理器支持最为丰富,对Linux的支持最完善。其它系列的处理器和 *** 作系统基本是在2002年11 月PPCBOOT改名为U-Boot后逐步扩充的。从PPCBOOT向U-Boot的顺利过渡,很大程度上归功于U-Boot的维护人德国DENX软件工程中心Wolfgang Denk[以下简称W.D]本人精湛专业水平和执着不懈的努力。当前,U-Boot项目正在他的领军之下,众多有志于开放源码BOOT LOADER移植工作的嵌入式开发人员正如火如荼地将各个不同系列嵌入式处理器的移植工作不断展开和深入,以支持更多的嵌入式 *** 作系统的装载与引导。

可知程序的入口在_start,在SourceInsight中查找可发现程序的入口_start在u-boot-2016.05\arch\arm\lib\vectors.S中。
。。。
ENTRY(_start)
SECTIONS
{
。。。
。 = 0x00000000;
。 = ALIGN(4);
.text :
{
*(.__image_copy_start)
*(.vectors)
CPUDIR/start.o (.text*)
*(.text*)
}
。。。
。 = ALIGN(4);
.rodata : { *(SORT_BY_ALIGNMENT(SORT_BY_NAME(.rodata*))) }
。 = ALIGN(4);
.data : {
*(.data*)
}
。 = ALIGN(4);
。 = 。;
。。。
.bss_start __rel_dyn_start (OVERLAY) : {
KEEP(*(.__bss_start));
__bss_base = 。;
}
.bss __bss_base (OVERLAY) : {
*(.bss*)
。 = ALIGN(4);
__bss_limit = 。;
}
.bss_end __bss_limit (OVERLAY) : {
KEEP(*(.__bss_end));
}
。。。
}
12345678910111213141516171819202122232425262728293031323334353637383940414243444546474849505152
进入boot-2016.05\arch\arm\lib\vectors.S中,可以看到从_start开始后就跳转到reset去执行:
。。。
.globl _start
。。。
_start:
#ifdef CONFIG_SYS_DV_NOR_BOOT_CFG
.word CONFIG_SYS_DV_NOR_BOOT_CFG
#endif
b reset
ldr pc, _undefined_instrucTIon
ldr pc, _software_interrupt
ldr pc, _prefetch_abort
ldr pc, _data_abort
ldr pc, _not_used
ldr pc, _irq
ldr pc, _fiq
。。.12345678910111213141516171819202122
1、从u-boot-2016.05\arch\arm\cpu\arm920t\start.S中reset执行
主要执行流程:reset -》 cpu_init_crit -》 lowlevel_init -》 _main
reset:
。。。
#ifndef CONFIG_SKIP_LOWLEVEL_INIT
bl cpu_init_crit
#endif
bl _main
。。。
#ifndef CONFIG_SKIP_LOWLEVEL_INIT
cpu_init_crit:
。。。
bl lowlevel_init
。。。
#endif /* CONFIG_SKIP_LOWLEVEL_INIT */
1234567891011121314151617181920212223
2、由bl _main跳转到u-boot-2016.05\arch\arm\lib\crt0.S中从入口_main开始执行
主要执行流程:board_init_f -》 relocate_code -》 board_init_r
ENTRY(_main)
。。。
bl board_init_f_alloc_reserve
。。。
bl board_init_f_init_reserve
。。。
bl board_init_f
#if ! defined(CONFIG_SPL_BUILD)
。。。
b relocate_code
。。。
#endif
#if !defined(CONFIG_SPL_BUILD) || defined(CONFIG_SPL_FRAMEWORK)
。。。
#if defined(CONFIG_SYS_THUMB_BUILD)
。。。
#else
ldr pc, =board_init_r
#endif
#endif
ENDPROC(_main)123456789101112131415161718192021222324252627282930313233
这部分有三点说明:
⑴、u-boot-2016.05\common\board_f.c:board_init_f通过initcall_run_list(init_sequence_f)函数执行一系列初始化函数以实现前半部分板级初始化。全局结构体gd在u-boot-2016.05\arch\arm\include\asm\global_data.h中声明:
#define DECLARE_GLOBAL_DATA_PTR register volaTIle gd_t *gd asm (“r9”)1
⑵、u-boot-2016.05\arch\arm\lib\relocate.S:relocate_code实现uboot代码的重定位,此部分如果觉得源代码不是简单明了可自己改写。
⑶、去重定位uboot有两种路径:
一种是将gd-》flags设为0,在初始化函数序列init_sequence_f中的jump_to_copy函数中去跳转到relocate_code:
staTIc int jump_to_copy(void)
{
if (gd-》flags & GD_FLG_SKIP_RELOC)
return 0;
。。。
#if defined(CONFIG_X86) || defined(CONFIG_ARC)
。。。
#else
relocate_code(gd-》start_addr_sp, gd-》new_gd, gd-》relocaddr);
#endif
return 0;
}1234567891011121314
另一种就是不宏定义CONFIG_SPL_BUILD,然后在u-boot-2016.05\arch\arm\lib\crt0.S中通过
#if ! defined(CONFIG_SPL_BUILD)
。。。
b relocate_code
。。。
#endif123456789
来跳转到relocate_code。以上两种方法选其一,另一种就得去掉。
3、在上一步通过ldr pc, =board_init_r指令进入u-boot-2016.05\common\board_r.c:board_init_r函数,进而调用initcall_run_list(init_sequence_r)函数执行一系列初始化函数以实现后半部分板级初始化,并在initcall_run_list函数里进入run_main_loop不再返回。
void board_init_r(gd_t *new_gd, ulong dest_addr)
{
。。。
if (initcall_run_list(init_sequence_r))
hang();
/* NOTREACHED - run_main_loop() does not return */
hang();
}
1234567891011
init_sequence_r是一个函数指针数组,里面存放了很多初始化函数指针,里面有两个重要的函数指针initr_announce和run_main_loop:
init_fnc_t init_sequence_r[] = {
。。。
initr_announce,
。。。
run_main_loop,
};12345678910
initr_announce函数声明从此处开始程序就将跳转到RAM中运行:
static int initr_announce(void)
{
debug(“Now running in RAM - U-Boot at: %08lx\n”, gd-》relocaddr);
return 0;
}12345
最后一项是run_main_loop ,进入run_main_loop 后便不再返回。
4、在run_main_loop 里会进入u-boot-2016.05\common\main.c:main_loop函数
static int run_main_loop(void)
{
。。。
for (;;)
main_loop();
return 0;
}12345678
进入main_loop之前就已经完成初始化,接下来准备去处理命令
/* We come here after U-Boot is initialised and ready to process commands */
void main_loop(void)
{
const char *s;
bootstage_mark_name(BOOTSTAGE_ID_MAIN_LOOP, “main_loop”);
。。。
/* get environment_variable: s = getenv(“bootcmd”); -》 bootcmd */
s = bootdelay_process();
。。。
autoboot_command(s);
。。。
}123456789101112131415161718
main_loop函数里有两个重要的过程:
⑴、首先在bootdelay_process函数里通过s = getenv(“bootcmd”)得到bootcmd参数并返回bootcmd参数,
const char *bootdelay_process(void)
{
char *s;
int bootdelay;
。。。
s = getenv(“bootdelay”);
。。。
debug(“### main_loop entered: bootdelay=%d\n\n”, bootdelay);
。。。
s = getenv(“bootcmd”);
。。。
stored_bootdelay = bootdelay;
return s;
}1234567891011121314151617181920212223
其中,bootcmd参数通过以下方式指定:
先在u-boot-2016.05\include\env_default.h中
#ifdef CONFIG_BOOTCOMMAND
“bootcmd=” CONFIG_BOOTCOMMAND “\0”
#endif123
再在u-boot-2016.05\include\configs\smdk2440.h中指定
#define CONFIG_BOOTCOMMAND “nand read 30000000 kernel;bootm 30000000”1
⑵、然后进入autoboot_command函数,并将bootcmd参数传入,继而进入run_command_list函数,继续将bootcmd参数传入
void autoboot_command(const char *s)
{
。。。
if (stored_bootdelay != -1 && s && !abortboot(stored_bootdelay)) {
。。。
run_command_list(s, -1, 0);
。。。
}
。。。
}
123456789101112
5、从autoboot_command函数进入u-boot-2016.05\common\cli.c:run_command_list函数后,接着会调用board_run_command函数去执行命令
int run_command_list(const char *cmd, int len, int flag)
{
int need_buff = 1;
char *buff = (char *)cmd; /* cast away const */
int rcode = 0;
if (len == -1) {
len = strlen(cmd);
#ifdef CONFIG_SYS_HUSH_PARSER
。。。
#else
/* the built-in parser will change our string if it sees \n */
need_buff = strchr(cmd, ‘\n’) != NULL;
#endif
}
if (need_buff) {
buff = malloc(len + 1);
if (!buff)
return 1;
memcpy(buff, cmd, len);
buff[len] = ‘\0’;
}
#ifdef CONFIG_SYS_HUSH_PARSER
。。。
#ifdef CONFIG_CMDLINE
。。。
#else
rcode = board_run_command(buff);
#endif
#endif
。。。
}1234567891011121314151617181920212223242526272829303132
那么,board_run_command如何去执行命令?
首先,board_run_command函数通过bootcmd参数中的bootm命令找到u-boot-2016.05\cmd\bootm.c中的
U_BOOT_CMD(
bootm, CONFIG_SYS_MAXARGS, 1, do_bootm,
“boot application image from memory”, bootm_help_text
);1234
然后,根据这个信息找到执行bootm命令的处理函数指针do_bootm,并进入do_bootm函数执行相关代码,而U_BOOT_CMD在u-boot-2016.05\include\command.h中定义:
#define U_BOOT_CMD(_name, _maxargs, _rep, _cmd, _usage, _help) \
U_BOOT_CMD_COMPLETE(_name, _maxargs, _rep, _cmd, _usage, _help, NULL)12
#define U_BOOT_CMD_COMPLETE(_name, _maxargs, _rep, _cmd, _usage, _help, \
_comp) \
_CMD_REMOVE(sub_ ## _name, _cmd)123
#define _CMD_REMOVE(_name, _cmd) \
int __remove_ ## _name(void) \
{ \
if (0) \
_cmd(NULL, 0, 0, NULL); \
return 0; \
}1234567
在此,board_run_command函数还会将bootm命令中的参数(内核映像所在地址)30000000赋给bootm_headers_t结构体变量images,则images首地址就是30000000,images在u-boot-2016.05\cmd\bootm.c中定义:
bootm_headers_t images; 1
欢迎分享,转载请注明来源:内存溢出

 微信扫一扫
微信扫一扫
 支付宝扫一扫
评论列表(0条)