
表的基本查询
表的增删查改
表的增删查改,简称表的 CURD *** 作 : Create(创建),Update(更新),Retrieve(读取),Delete(删除).
下面我们逐一进行介绍。
1. Create
语法:
		INSERT [INTO] table_name
			[(column [, column] ...)]
			VALUES (value_list) [, (value_list)] ...

		value_list: value, [, value] ...
例如创建一张学生表:
			create table students(
			    -> id int unsigned primary key auto_increment,
			    -> stunum int not null unique comment '学号',
			    -> name varchar(20) not null,
			    -> email varchar(20)
			    -> );
(1)单行数据 + 全列插入
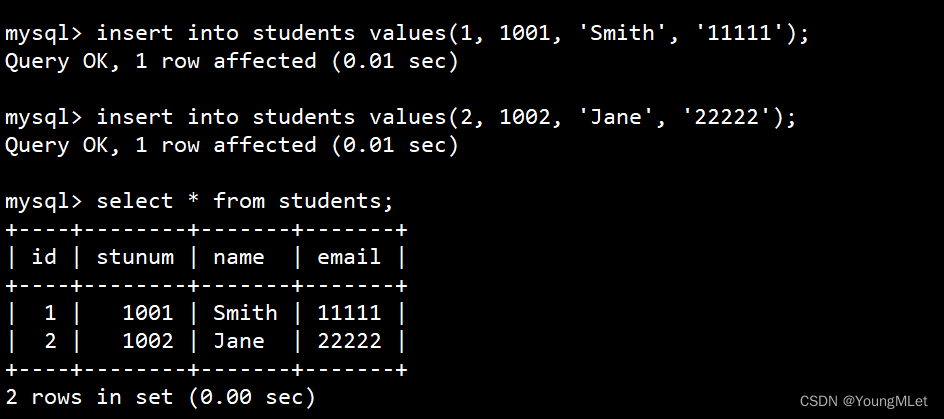
接下来我们插入两条记录,其中 value_list 数量必须和定义表的列的数量及顺序一致:
例如插入一个数据:
insert into students values(1, 1001, 'Smith', '11111');
其中 into 可以省略;示例如下:
(2)多行数据 + 指定列插入
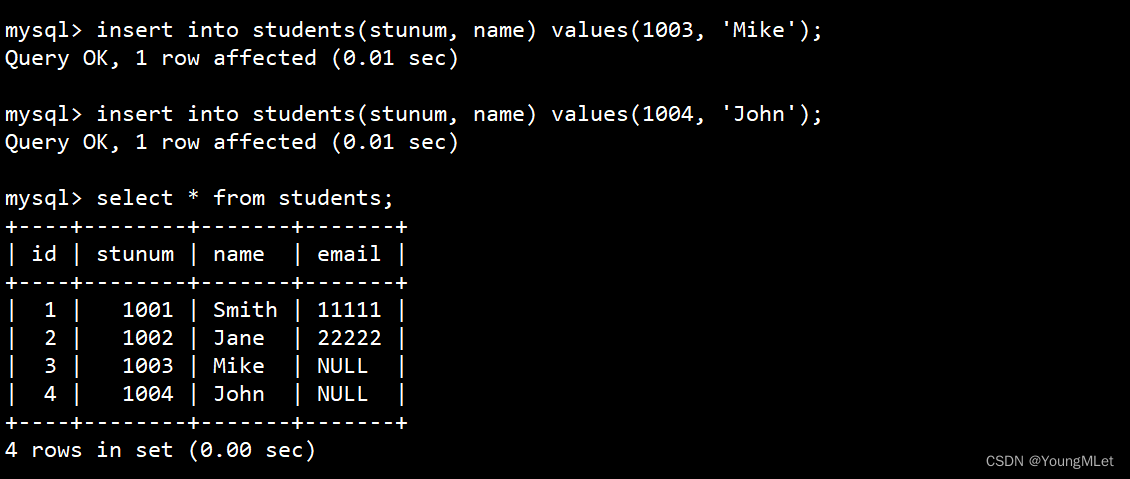
我们可以在表的名字后面带上需要插入的字段,并且 value_list 数量必须和指定字段数量及顺序一致,例如,我们只想插入 stunum 和name 字段:
insert into students(stunum, name) values(1003, 'Mike');
示例如下:
(3)插入否则更新
由于主键或者唯一键对应的值已经存在会而导致插入失败。
我们先查看我们当前表的数据:
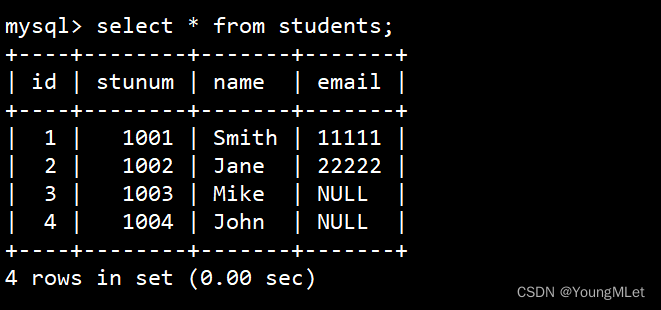
其中 id 为主键,stunum 为唯一键,所以我们分别尝试插入主键和唯一键冲突的数据:

如上图,插入失败。所以我们可以选择性的进行同步更新 *** 作语法:
		insert...
			on duplicate key update column = value [, column = value] ...
例如我们想插入 Jane 这位同学的数据,但是我们并不知道这位同学是否存在于这张表中,所以我们使用上面的语法,假设不存在,就按照我们的数据插入数据;否则我们将她的 stunum 更新为 1010:
			insert into students(id, stunum, name) values(2, 1010, 'Jane')
			    -> on duplicate key update stunum = 1010, name = 'Jane';
如下:
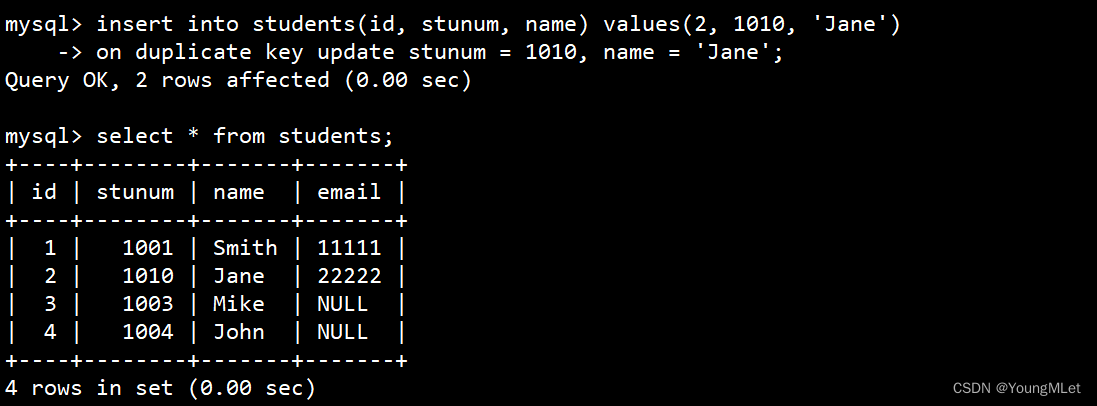
我们可以观察到当插入成功后,会有 2 rows affected (0.00 sec) 这样的提示,即:

这个提示的含义如下:
- 0 row affected: 表中有冲突数据,但冲突数据的值和 update 的值相等
- 1 row affected: 表中没有冲突数据,数据被插入
- 2 row affected: 表中有冲突数据,并且数据已经被更新
(4)替换
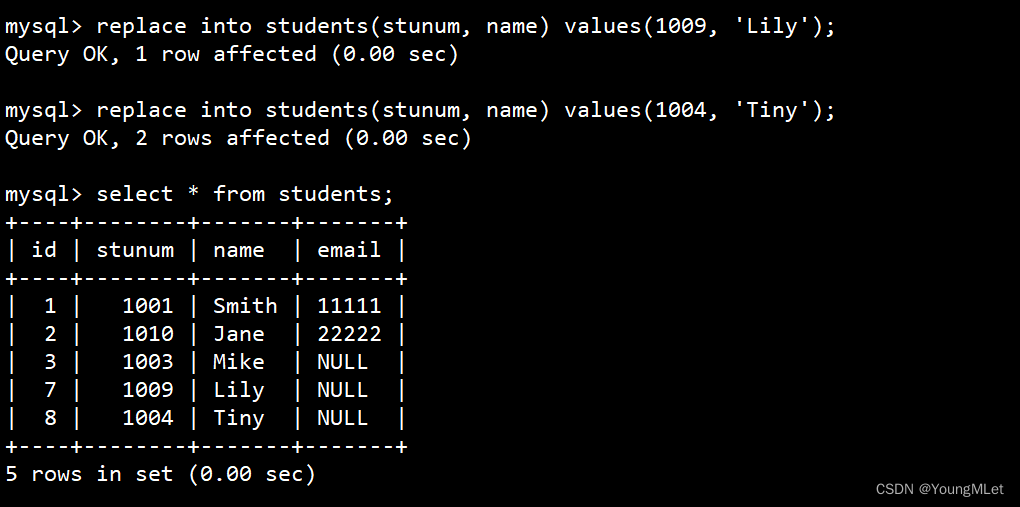
替换的本质:主键或者唯一键没有冲突,则直接插入;主键 或者 唯一键 如果冲突,则删除后再插入。
替换将 insert 换成 replace 使用即可。示例如下:
2. Retrieve
Retrieve 指的是表的读取。
语法:
			SELECT
				[DISTINCT] {* | {column [, column] ...}
				[FROM table_name]
				[WHERE ...]
				[ORDER BY column [ASC | DESC], ...]
				LIMIT ...
我们先创建一个表结构:
			create table exam_result(
			    -> id int unsigned primary key auto_increment,
			    -> name varchar(20) not null comment '姓名',
			    -> chinese float default 0.0 comment '语文成绩',
			    -> math float default 0.0 comment '数学成绩',
			    -> english float default 0.0 comment '英语成绩'
			    -> );

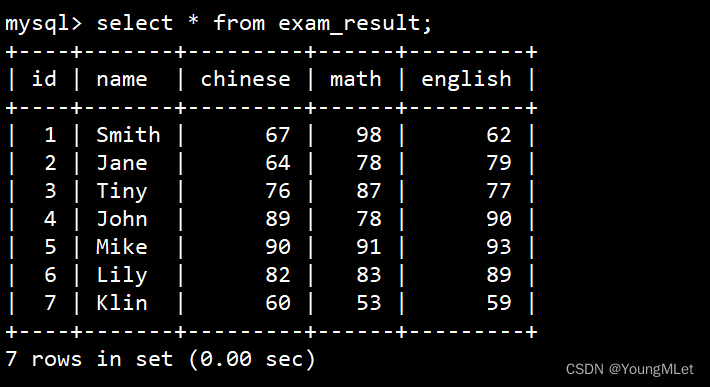
接下来插入一些数据:
			insert into exam_result(name, chinese, math, english) values
			    -> ('Smith', 67, 98, 62),
			    -> ('Jane', 64, 78, 79),
			    -> ('Tiny', 76, 87, 77),
			    -> ('John', 89, 78, 90),
			    -> ('Mike', 90, 91, 93),
			    -> ('Lily', 82, 83, 89),
			    -> ('Klin', 60, 53, 59);
(1)select 列
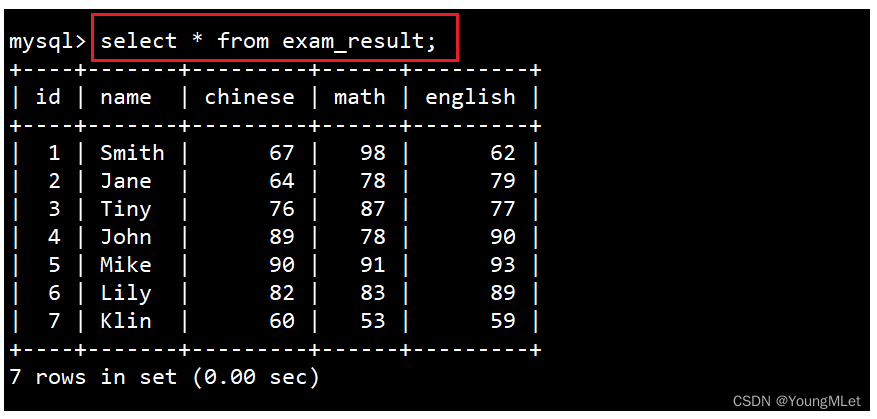
a. 全列查询
语法:SELECT * FROM 表名;
通常情况下不建议使用 * 进行全列查询,因为:
-
- 查询的列越多,意味着需要传输的数据量越大;
-
- 可能会影响到索引的使用。(索引待后面讲解)
例如:
b. 指定列查询
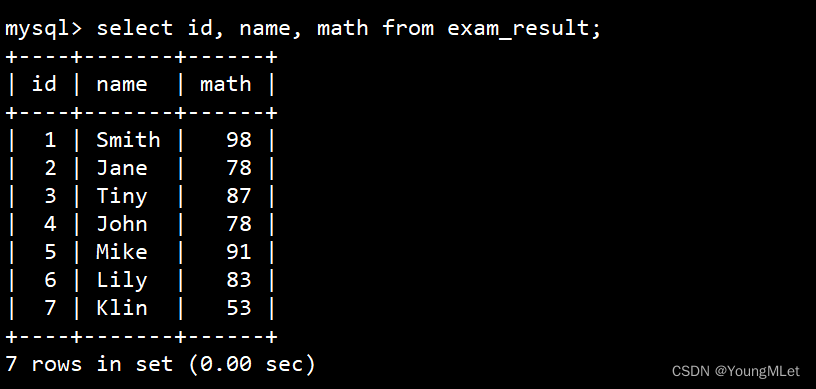
指定列的顺序不需要按定义表的顺序来,语法就是在 select 后跟上指定的字段列即可。例如我们只需要查询 id、name、math,如下:
select id, name, math from exam_result;
c. 查询字段为表达式
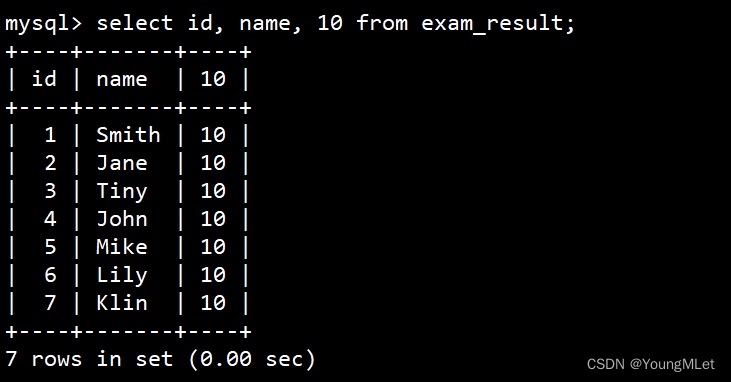
- 表达式不包含字段:
select id, name, 10 from exam_result;
- - - 显示 10
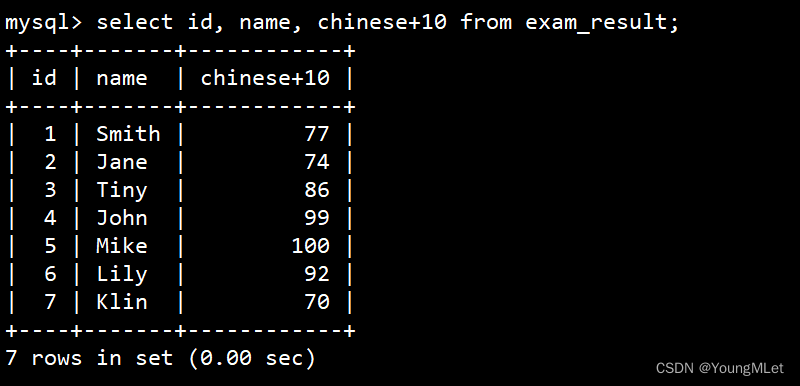
- 表达式包含一个字段:
select id, name, chinese+10 from exam_result;
- - - 使语文成绩 + 10 分
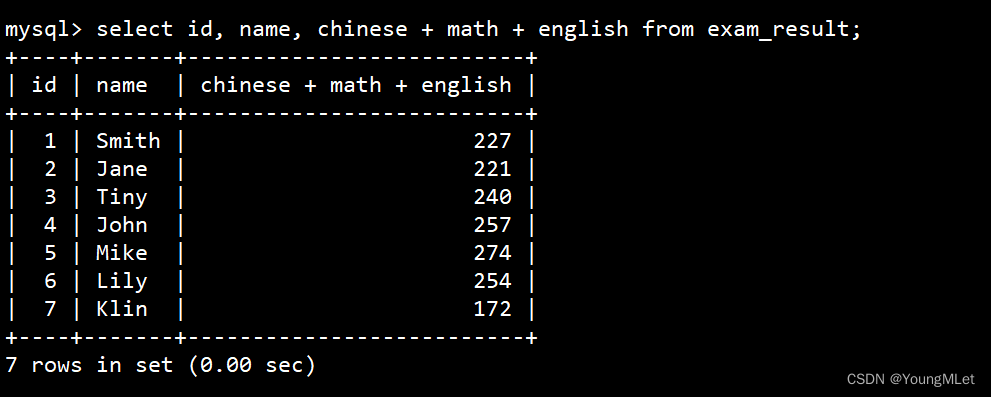
- 表达式包含多个字段:
select id, name, chinese + math + english from exam_result;
- - - 统计总成绩
d. 为查询结果指定别名
语法:SELECT column [AS] alias_name […] FROM table_name;
例如将上面统计的总成绩的字段改为总分:
select id, name, chinese + math + english as 总分 from exam_result;
- - - as 可以加也可以不加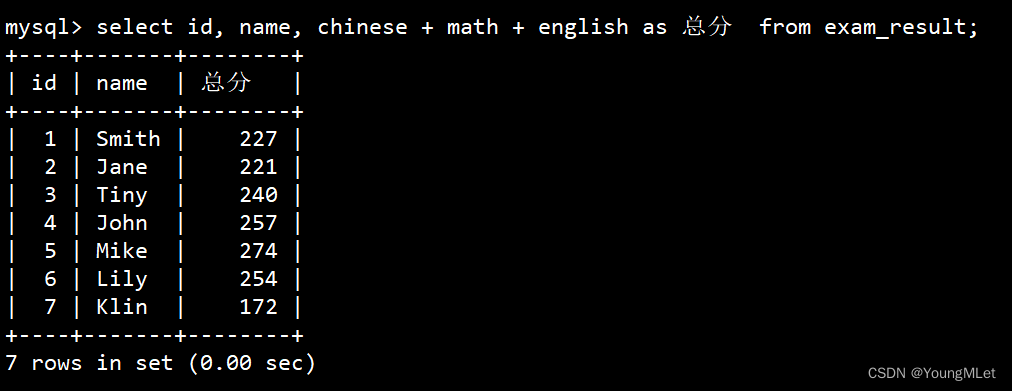
e. 结果去重
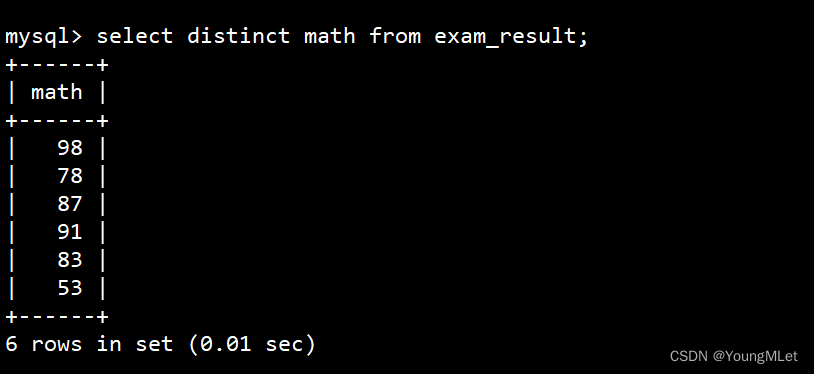
去重使用关键字 DISTINCT,直接加在 select 后即可。例如 math 中 78 的分数重复了:
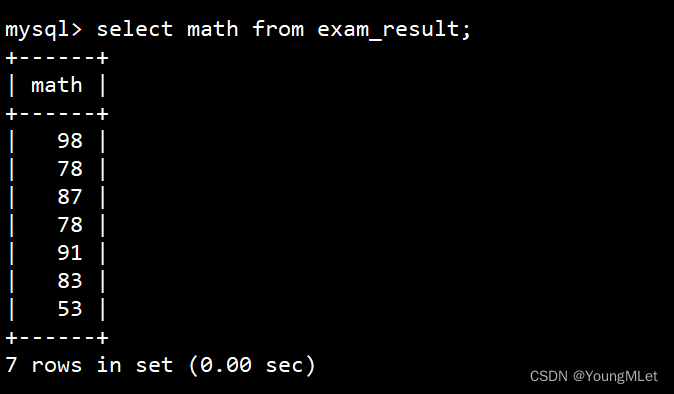
结果去重:
select distinct math from exam_result;
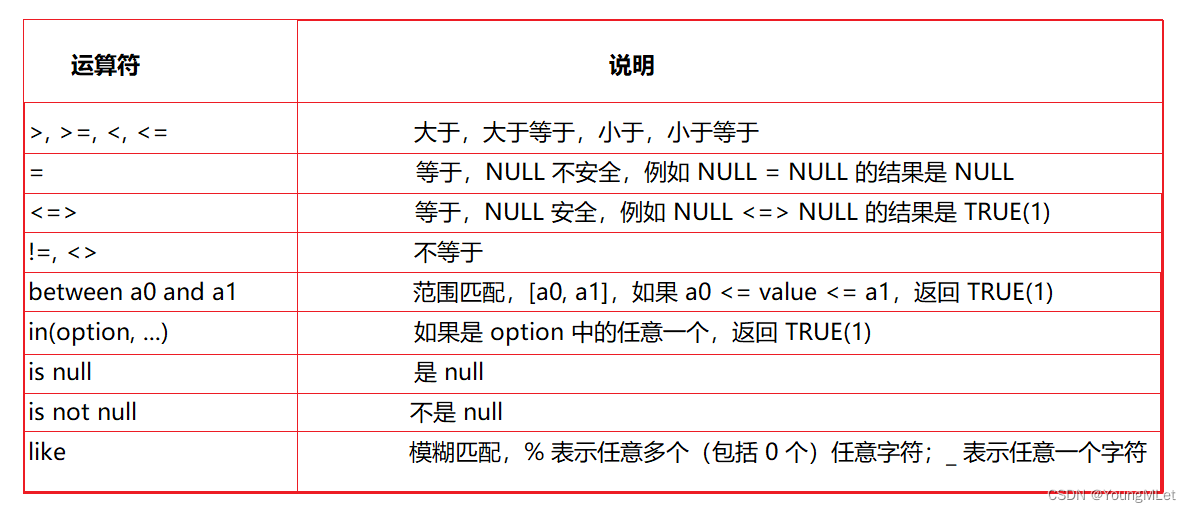
(2)where 条件
- 比较运算符:
- 逻辑运算符:

使用 where 筛选条件只需将 where 放在语句最后,后面跟上条件即可,下面举一些实例:
-
英语不及格的同学及英语成绩 ( < 60 )
select name, english from exam_result where english < 60;

- 语文成绩在 [80, 90] 分的同学及语文成绩
-
使用 and 进行条件连接
select name, chinese from exam_result where chinese >= 80 and chinese <= 90;

-
使用 between … and … 条件
select name, chinese from exam_result where chinese between 80 and 90;

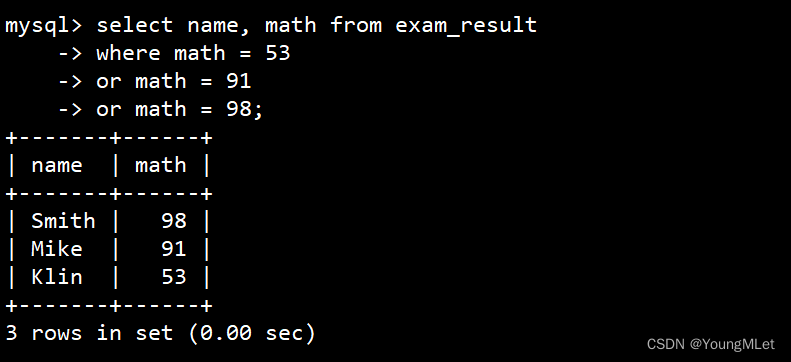
- 数学成绩是 53 或者 91 或者 98 分的同学及数学成绩
-
使用 or 进行条件连接
  		select name, math from exam_result
  		    -> where math = 53
  		    -> or math = 91
  		    -> or math = 98;
-
使用 in 条件
select name, math from exam_result where math in(53, 91, 98);

- 以字母 J 开头的同学
-
% 匹配任意多个(包括 0 个)任意字符
select name from exam_result where name like 'J%';

- _ 匹配严格的一个任意字符
例如需要查找 J 某同学:
select name from exam_result where name like 'J_';
- 英语成绩好于数学成绩的同学
-
where 条件中比较运算符两侧都是字段
select name, math, english from exam_result where english > math;

- 总分在 200 分以下的同学
-
where 条件中使用表达式
-
别名不能用在 where 条件中,因为有 where 语句的语句中,先筛选 where 语句的条件,再读取筛选后的表
select name, chinese+math+english total from exam_result where chinese+math+english < 200;

- 英语成绩 > 80 并且姓名首字母不以 M 开头的同学
-
and 于 not 的使用
  		select name, english from exam_result
  		    -> where english > 80 and name not like 'M%';

- 名字首字母以 T 开头的同学,否则要求总成绩 > 200 并且 语文成绩 < 数学成绩 并且 英语成绩 > 80
-
综合性查询
  		select name, chinese, math, english, chinese+math+english total from exam_result
  		    -> where name like 'T%'
  		    -> or chinese+math+english > 200
  		    -> and chinese < math
  		    -> and english > 80;

- null 的查询
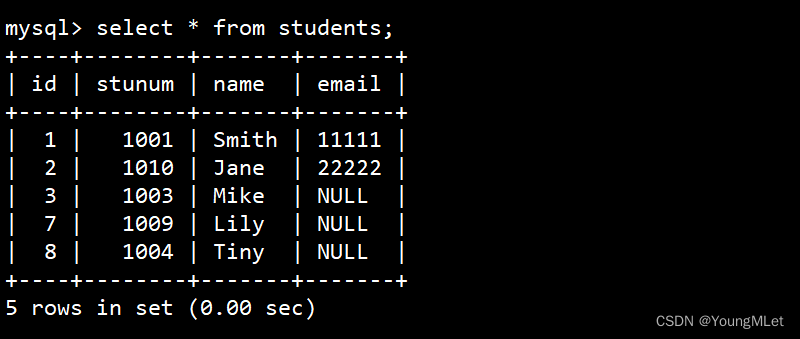
接下来我们切回 students 表进行查询:
-
查询 email 已知的同学姓名
select name, email from students where email is not null;

-
NULL 和 NULL 的比较,= 和 <=> 的区别
select null = null, null = 1, null = 0;
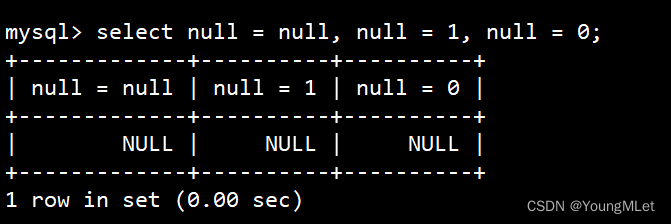
select NULL <=> NULL, NULL <=> 1, NULL <=> 0

(3)结果排序
语法:
-
asc 为升序(从小到大)
-
desc 为降序(从大到小)
-
默认为 asc
  		select ... from table_name [where ...]
  			order by column [asc|desc], [...];
注意:没有 order by 子句的查询,返回的顺序是未定义的,永远不要依赖这个顺序。
下面看实例:
-
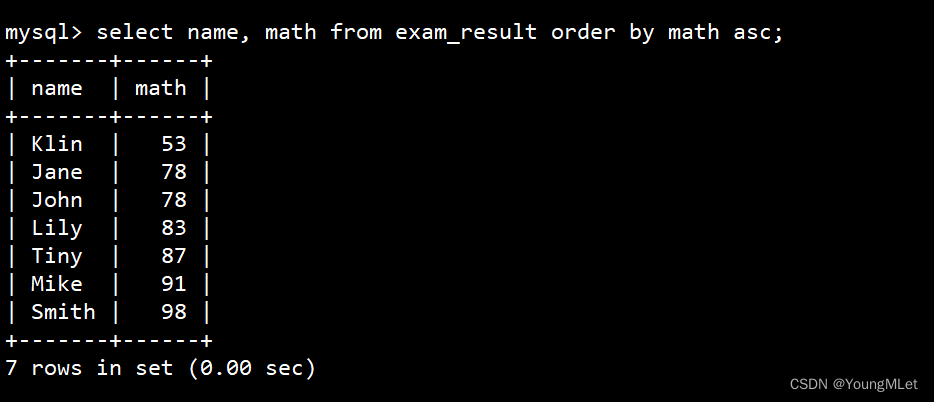
同学及数学成绩,按数学成绩升序显示
select name, math from exam_result order by math asc;
注:asc 可以省略
-
同学及 email,按 email 排序显示
select name, email from students order by email asc;
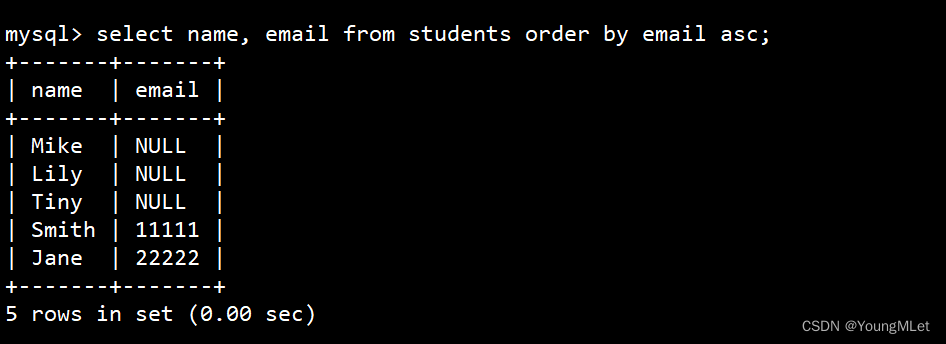
注意:NULL 视为比任何值都小,升序出现在最上面。
-
查询同学各门成绩,依次按 数学降序,英语升序,语文升序的方式显示
select name, math, english, chinese from exam_result order by math desc, english asc, chinese asc;
多字段排序,排序优先级随书写顺序:

- 查询同学及总分,由高到低
order by 子句中可以使用列别名,因为 order by 子句是最后执行的,要先有合适的数据,才能排序。
select name, chinese+math+english total from exam_result order by total desc;

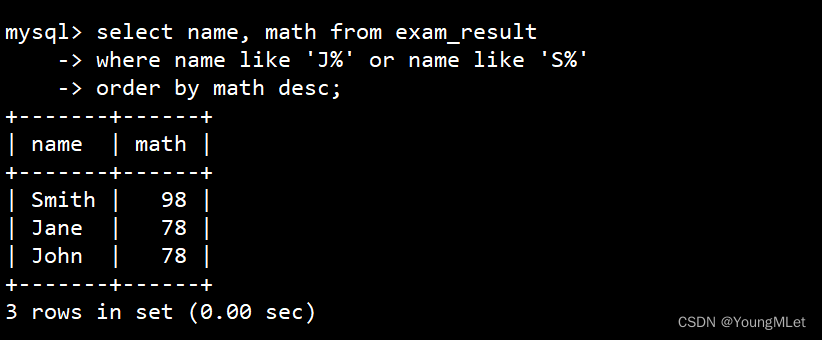
- 查询姓名首字母为 J 的同学或者为 S 的同学数学成绩,结果按数学成绩由高到低显示
结合 where 子句 和 order by 子句:
				select name, math from exam_result
				    -> where name like 'J%' or name like 'S%'
				    -> order by math desc;
(4)筛选分页结果
语法:
			起始下标为 0

			从 0 开始,筛选 n 条结果
			select... from table_name [where ...] [order by ...] limit n;

			从 s 开始,筛选 n 条结果
			select... from table_name [where ...] [order by ...] limit s, n;

			从 s 开始,筛选 n 条结果,比第二种用法更明确,建议使用
			select... from table_name [where ...] [order by ...] limit n offset s;
建议:对未知表进行查询时,最好加一条 limit 1,避免因为表中数据过大,查询全表数据导致数据库卡死。
实例:
- 按 id 进行分页,每页 3 条记录,分别显示 第 1、2、3 页
第一页:
			select name, chinese, math, english from exam_result
			    -> order by id limit 3 offset 0;

第二页:
select name, chinese, math, english from exam_result order by id limit 3 offset 3;

第三页,如果结果不足 3 个,不会有影响:
select name, chinese, math, english from exam_result order by id limit 3 offset 6;

3. Update
语法:
			update table_name set column = expr [, column = expr ...]
				[where ...] [order by ...] [limit ...];
实例:
- 将 Jane 同学的数学成绩变更为 80 分
查看原数据:

更新数据:
update exam_result set math=80 where name='Jane';
查看更新后数据:

- 将 John 同学的语文成绩变更为 80 分,英语成绩变更为 70 分
- 一次更新多个列
查看原数据:

更新数据:
update exam_result set chinese=80, english=70 where name='John';
查看更新后数据:

- 将总成绩倒数前三的 3 位同学的数学成绩加上 30 分
查看原数据:
select name, math, chinese+math+english total from exam_result order by total limit 3;

更新数据:
update exam_result set math = math + 30 order by chinese+math+english limit 3;
查看更新后的数据,注意不能再用查看总分倒数前三的方式,因为给他们加上 30 分之后,他们就有可能不是倒数前三了,要单独去查看他们三个人的成绩:
select name, math, chinese+math+english total from exam_result where name in('Klin', 'Jane', 'Smith');

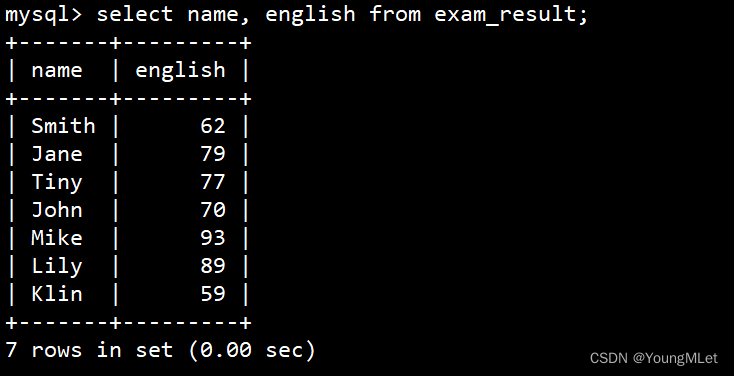
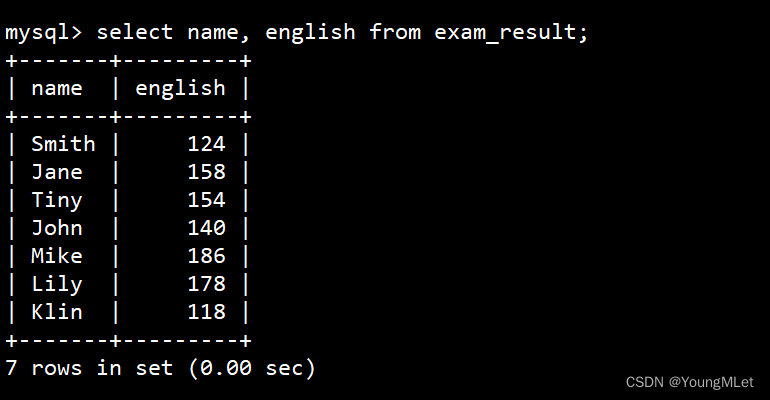
- 将所有同学的英语成绩更新为原来的 2 倍
查看原数据:
更新数据:
update exam_result set english = english * 2;
查看更新后的数据:
注意:更新全表的语句慎用!
4. Delete
(1)删除数据
语法:
delete from table_name [where ...] [order by ...] [limit ...];
实例:
- 删除 Lily 同学的考试成绩
查看原数据:

删除数据:
delete from exam_result where name='Lily';
查看删除后的数据:

- 删除整张表数据
我们查看当前库的表:
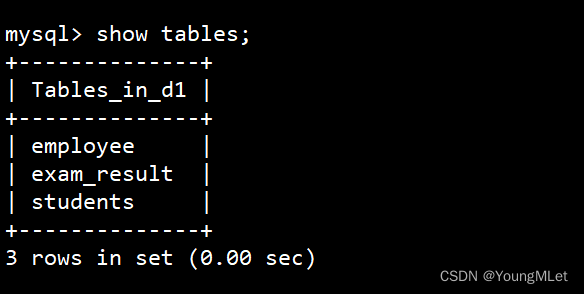
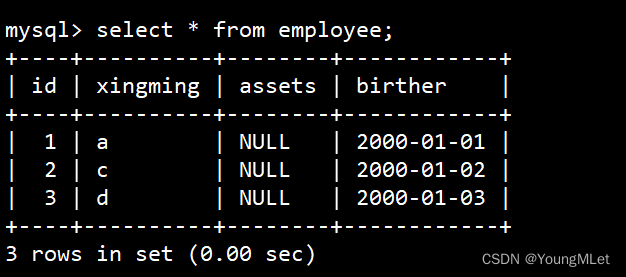
可以看到有一张 employee 表,我们查看这张表的数据如下:
再查看表的结构:

然后我们把整表数据删除:
delete from employee;
再查看就发现数据全没了:

再插入一条数据,自增 id 在原值上继续增长:

注意:删除整表 *** 作要慎用!
(2)截断表
语法:
truncate [table] table_name
注意:这个 *** 作慎用
- 只能对整表 *** 作,不能像 delete 一样针对部分数据 *** 作;
- 实际上 MySQL 不对数据 *** 作,所以比 delete 更快,但是 truncate 在删除数据的时候,并不经过真正的事务,所以无法回滚;
- 会重置 auto_increme 项
接下来我们重新向 employee 表重新插入数据:
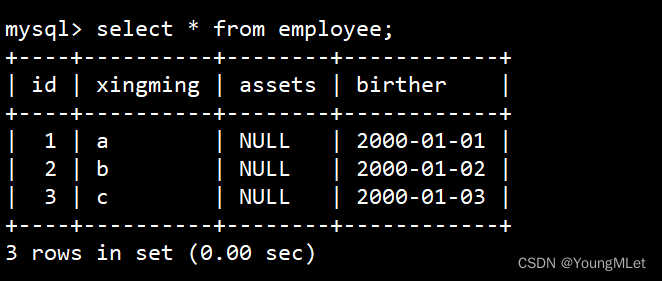
截断整表数据,注意影响行数是 0,所以实际上没有对数据真正 *** 作:
truncate employee;

再插入一条数据,自增 id 在重新增长:

5. 插入查询结果
语法:
insert into table_name [(column [, column ...])] select ...
实例:创建一个新表,插入一个旧表中查询到的去重后的数据
-
先创建一个旧表,并插入数据:
  		mysql> create table duplicate_table (id int, name varchar(20));
  		mysql> INSERT INTO duplicate_table VALUES
  		    -> (100, 'aaa'),
  		    -> (100, 'aaa'),
  		    -> (200, 'bbb'),
  		    -> (200, 'bbb'),
  		    -> (200, 'bbb'),
  		    -> (300, 'ccc');
-
创建一个新表,和旧表的结构一样
create table no_duplicate_table like duplicate_table;
-
将旧表的去重数据插入到新表中
insert into no_duplicate_table select distinct * from duplicate_table;
-
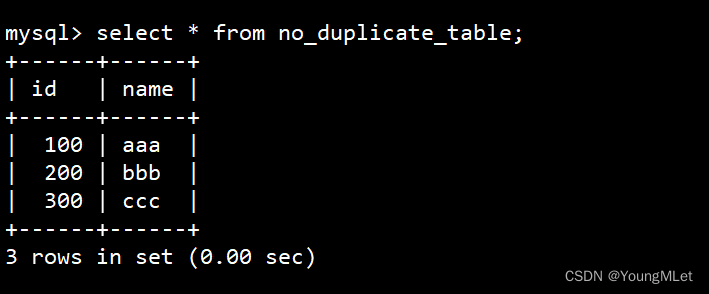
最后查看新表的数据
6. 聚合函数
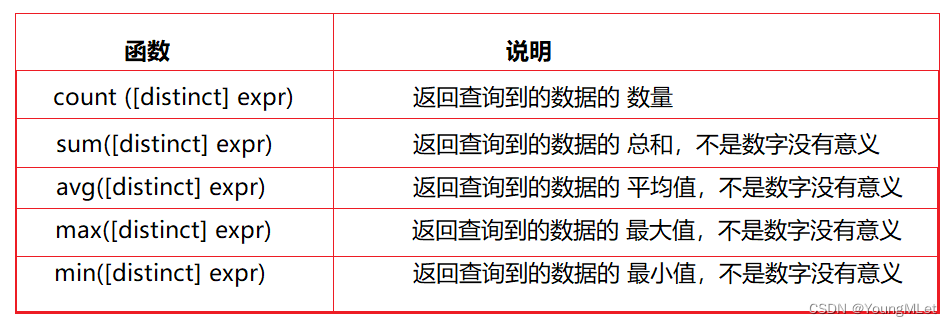
实例:
-
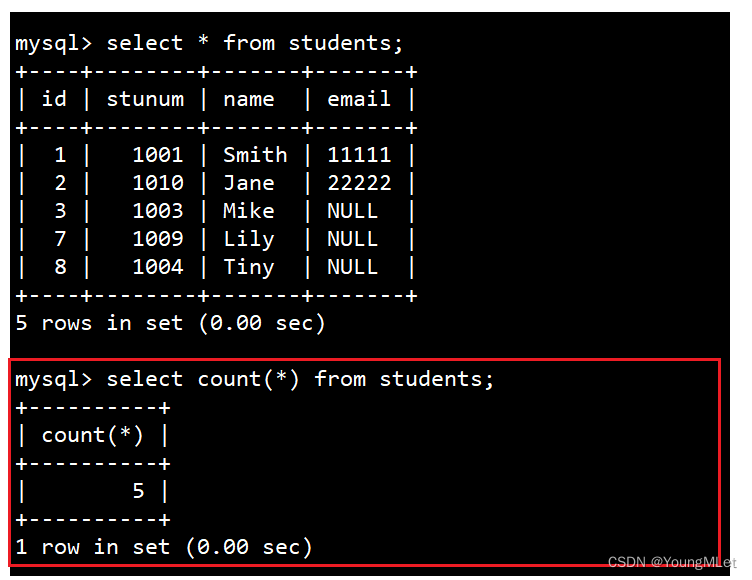
统计班级共有多少同学
select count(*) from students;
- 使用 * 做统计,不受 NULL 影响
-
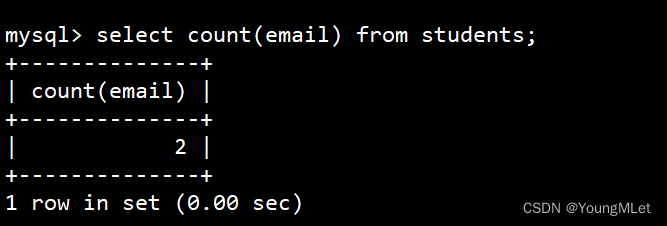
统计班级收集的 email 有多少
select count(email) from students;
- NULL 不会计入结果
-
统计本次考试的英语成绩分数个数
select count(english) from exam_result;
- count(english) 统计的是全部成绩

- count(distinct math) 统计的是去重成绩数量

-
统计数学成绩总分
select sum(math) from exam_result;

-
统计平均总分
select avg(chinese+math+english) 平均总分 from exam_result;

-
返回语文最高分
select max(chinese) from exam_result;

-
返回 > 70 分以上的语文最低分
select min(chinese) from exam_result where chinese > 70;

7. group by 子句的使用
在 select 中使用 group by 子句可以对指定列进行分组查询。
语法:
select column1, column2, .. from table group by column;
分组的目的是为了分组之后,方便进行聚合统计。分组的本质就是把一组按照条件拆分成了多个组,进行各自组内的统计!分组其实也是"分表",就是把一张表按照条件在逻辑上拆分成了多个子表,然后分别对各自的子表进行聚合统计!
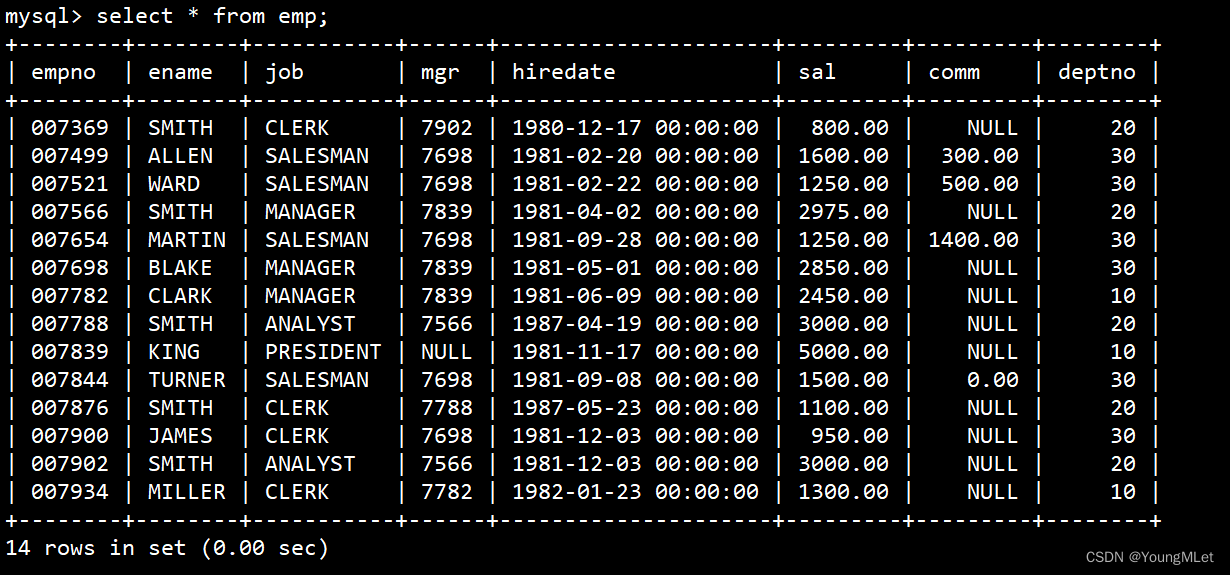
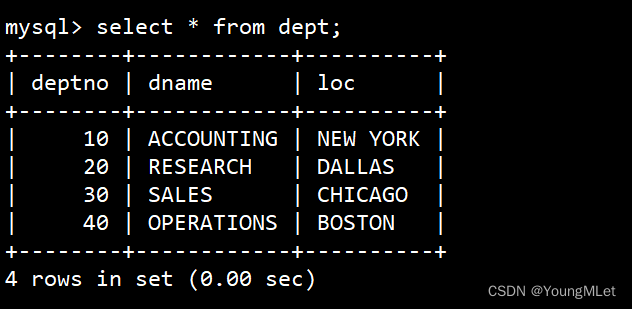
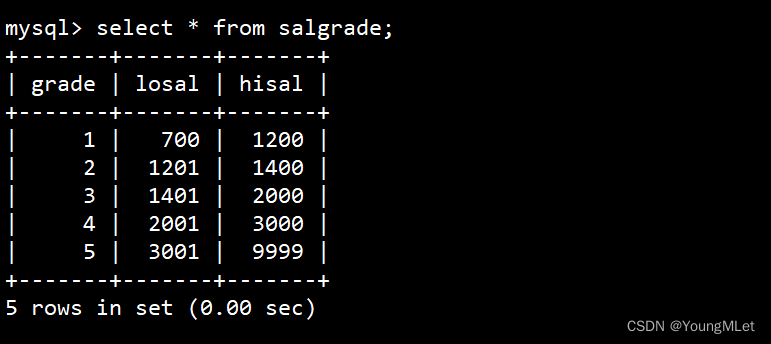
实例,需要准备一张雇员信息表(来自oracle 9i的经典测试表),表的链接:oracle 9i的经典测试表 包括:
- emp 员工表
- dept 部门表
- salgrade 工资等级表
查看 emp 表数据:
查看 dept 表的数据:
查看 salgrade 表的数据:
接下来开始使用分组 *** 作:
- 显示每个部门的平均工资和最高工资
很明显,显示每个部门的平均工资和最高工资,是需要按部门分组,分别显示部门号、平均工资和最高工资:
select deptno, avg(sal), max(sal) from emp group by deptno;

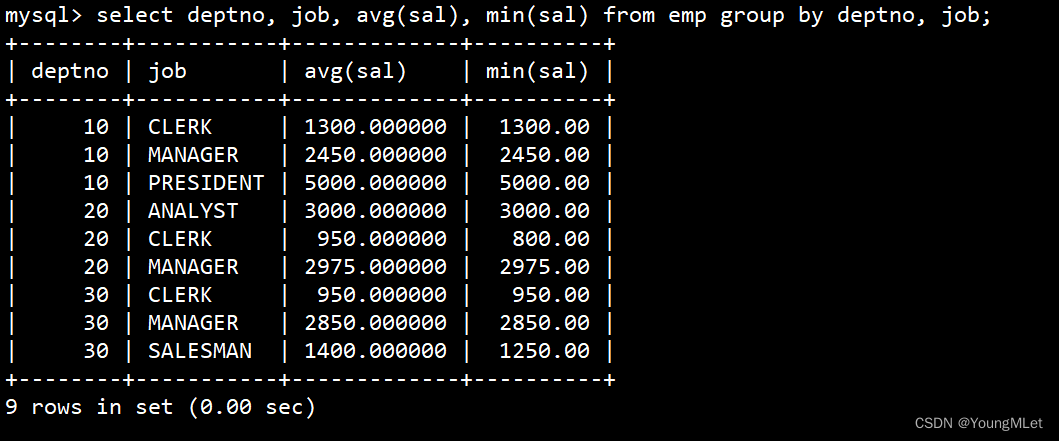
- 显示每个部门的每种岗位的平均工资和最低工资
每个部门的每种岗位,即要按照部门和岗位进行分组:
select deptno, job, avg(sal), min(sal) from emp group by deptno, job;
- 显示平均工资低于2000的部门和它的平均工资
-
先统计各个部门的平均工资
select deptno, avg(sal) from emp group by deptno;

-
使用 having 对分组进行筛选
select deptno, avg(sal) from emp group by deptno having avg(sal) < 2000;

注意:having 和 group by 配合使用,对 group by 结果进行过滤,having 经常和 group by 搭配使用,作用是对分组进行筛选,作用有些像 where.
having 是对聚合后的统计数据进行条件筛选。其中 having 和 where 的区别在于:
- 执行的顺序不一样,where 是对任意列进行条件筛选,一般是最先执行;having 是对分组聚合后的结果进行条件筛选,一般是最后才执行!
8. 相关题目练习
注意:SQL 查询中各个关键字的执行先后顺序:
from > on> join > where > group by > with > having > select > distinct > order by > limit
欢迎分享,转载请注明来源:内存溢出

 微信扫一扫
微信扫一扫
 支付宝扫一扫
评论列表(0条)